Tuesday, December 31, 2019
Happy New Year Everyone!
Heres to another year of keeping it simple and just concentrating on one project at a time...cheers!
Tuesday, December 17, 2019
WIP on Elf Conversation
I couldn’t wait for the new Victrix Normans so I grabbed one from Conquest miniatures instead. I’m not sure if the quality is the same but I just had to get started. The shield arm is attached to the Norman shield which is a pain but so far so good. Gloves and cloak next... but he is already looking good with the feather on the helmet.
Influence from Victor Ambrus.
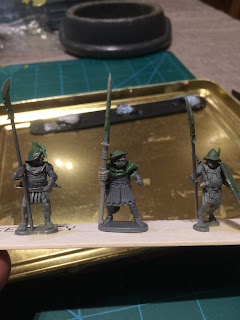
A Oathmark Elf with Saxon spear arm from Gripping Beast. Again feather helps to tie force together.
Influence from Victor Ambrus.
A Oathmark Elf with Saxon spear arm from Gripping Beast. Again feather helps to tie force together.
Monday, December 16, 2019
Victrix Norman to Elf Warrior
I’m getting quite excited by the soon to be released plastic Normans from Victrix. The main reason for this is I think they will make fantastic Elves. This idea comes from the talented painter and green stuff expert Graham Green. I have been looking at Graham’s converted Foundry Normans for a while, so when I saw Victrix were releasing ‘plastic’ Normans I thought this is the time to give it a go. They should mix well with other plastic Elf parts from GW and Oathmark, the odd greenstuff cloak should help matters.
I have never really been a massive fan of feathers on helmets but recently I have come around to it. A big feather on the front takes it away from historical and into Fantasy, it also helps to tie them in with my old Grenadier High Elves. To this point I will be going back and repainting the helmets of my archers to match these armoured infantry.
Also a green paint scheme should just help to nudge it away from historical Norman just a bit and the feathers will help there too.
I’m excited for this project, but can’t forget about the 50 odd plastic Orcs I have just made. These new plastics are making it a great time to be into fantasy war gaming, your imagination can go wild with so many new options available, good times.
Wednesday, December 04, 2019
Making orc helmets
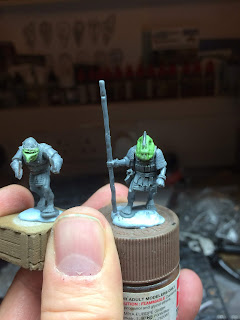
This standard bearer was always moaning about the cold so I bought him an early Christmas gift...yes orcs do celebrate Christmas!
These were great fun to make and some turned out better than others. Although they were made by orcs, so quality wise you can get away with quite a lot. In fact I was so egar to get sculpting that I started without letting the glue dry on the models, this meant I kept pushing the head off the body. In the end I took the head off altogether and just stuck a blob of green stuff on the torso and started sculpting. It looks a bit weird but should be okay when painted up. Another thing I found by trial and error is to leave the green stuff for around thirty minutes before trying to work it. I didn’t wait and it was very hard to get nice details punched into the armour. We live and learn and next time I know what to do.
These are very addictive and I’m not sure how many I will have made by the time I have sated myself. I hope they will bring a little more variety into the ranks of snarling, dirty orcs.
The nice thing about this stuff is that you can always add to it when it's dry and take a file to it to even things out. Another thing on my to do list, is to try out some chain mail by using a sharpened paperclip.
Sunday, December 01, 2019
Gundabad orcs
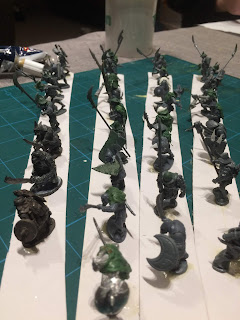
These new additions have been created using the old method of Warlord games orcs and Perry Miniatures arms. In addition to these sets, Oathmark, Games Workshop, Gripping Beast and Fireforge plastics have been used for greater variety. Green stuff furs and tattered cloaks have been made to cover the most crude plastic joins and goblin swords have been stuck on the spear tips, this looks a lot more ‘orcy’ than just spears. I like this look a lot and I think this batch are a big improvement on my older stuff. I may have to go back now and replace some of the spear points with goblins swords as I prefer the effect.
Seeing a large batch like this can be very daunting when it comes to painting them. However I’m going to try a new method. I’m going to pick out twelve of them at a time and paint them in small groups. This way I think I will enjoy it more and see results sooner. Let’s see how it turns out.
Seeing a large batch like this can be very daunting when it comes to painting them. However I’m going to try a new method. I’m going to pick out twelve of them at a time and paint them in small groups. This way I think I will enjoy it more and see results sooner. Let’s see how it turns out.
Creating more Gundabad orcs
I can’t believe how addictive creating these plastic conversions are. Although I remember it like yesterday, the last time I tinkered around with plastic orcs was around two or three years ago. Since then there has been many great plastic releases that can all be used to add to the variety of the conversions. Oathmark have even released an actual Goblin set with loads of arm and weapon options. The only thing is once you start to make these guys, the ideas start to come and before you know it you have another horde to paint up. All this was quite off putting until I remembered my own style of painting them... keep it simple. One base colour then wash with black. Spend more time on the flesh bits but try not to get too bogged down.
Since I last made any orcs I have joined a wargaming in Middle-earth Facebook group, some of the figures on here have been painted very well over many hours. This can be off putting when thinking about starting your own stuff again but you must remember what works for you and stick to it. I’m very much going for the overall look of an army rather than small groups of warriors.
Since I last made any orcs I have joined a wargaming in Middle-earth Facebook group, some of the figures on here have been painted very well over many hours. This can be off putting when thinking about starting your own stuff again but you must remember what works for you and stick to it. I’m very much going for the overall look of an army rather than small groups of warriors.
Sunday, October 27, 2019
Fire support
I thought just for some variety I would give one of these support guns a shield for extra protection. This should help to give this vehicle a bit more character and set it apart from the rest of the platoon. Although it’s been fun testing all the techniques on these guys, when the oil dries tomorrow on the guns I’m going to call it a day and varnish them. I feel I have tried everything now and learnt a lot for future jobs. I feel now though I’m going to ruin them if I keep on fiddling around. Every good thing has to come to an end... here’s to the next three!
Saturday, October 26, 2019
Blue Tac Camo
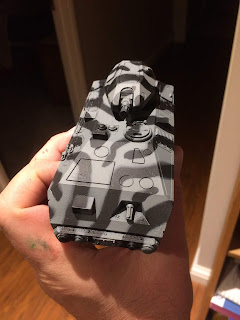
Live and learn, this time around I used an old tooth brush rather than my fingers to scrub the resin in soapy warm water. Just to be on the safe side I also gave the model a very slight spray of grey primer to give the paint something to bind to. The results were much better with no paint coming off with the blue tac.
This is always my favourite part of the job, peeling of the blue tac to see what’s underneath. It’s like unwrapping a Christmas present.
Thursday, October 24, 2019
Magnets!
This has been one of those projects where you really feel like you have pushed yourself into some uncomfortable places but come out wiser for it. I have finally got to grips with oil washes, used a Dremel, two part opoxy glue, weathering oils and tonight I had a light bulb moment and dug out some magnets. I had almost forgotten these, bought years ago for sticking 15mm Mechs together, they now came into there own on these armoured vehicles.
T
These armoured vehicles looked great but were seriously lacking in the firepower department. So off to EBay I went again and found a great dealer called Any scale. On here I found some WWII American heavy machine guns for mounting on tanks etc. Although they are old looking, onced fixed into place they should look fine.
At first I just had them stuck to the hull, this wasn’t perfect as they were low down and couldn’t swivel. Also they got in the way of anyone coming out of the hatch. It was around this time I remembered the magnets. Using some tiny but very strong ones I managed to build up the height of the gun mount that took it off the hull which allowed it to rotate 360%. Also when it was glued to the hull it was fragile and kept breaking off. I knew this would be a nightmare in storage, but with the magnets, the whole gun moved and could be removed without any worries. The main bonus for me though is the fact it can be moved around to aid game play and is now high enough to turn 360%. Finally got to use some magnets, another thing of the hobby bucket list.
I also used a larger couple of magnets in the command vehicle, again much joy at the sight of the turret rotating and staying in place. There has been ups and downs with this project but tonight has been a high. Magnets got to lov’em. As for the ‘Ground hogs’ they now look much more apt and look like they can put down some serious covering fire while their men mount up.
Southern Command APC
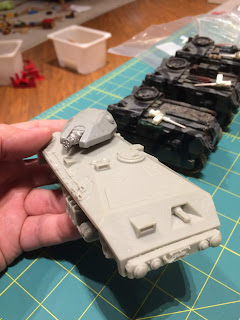
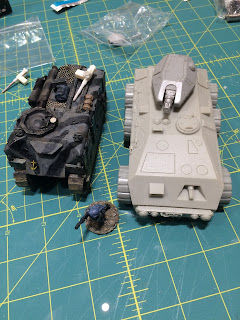
I’ve been enjoying this latest project so much I bought another vehicle to practice on. Again from EBay, this mighty APC strikes me more as a fast, well armoured command platform. It is a lovely looking thing with more than a slight whiff of ‘Aliens’ about it. It’s very hard not to paint in olive green but I think I will match the scheme to the ‘Groundhogs’, so the force ties together.
A bit of work with the Dremel, but not a lot compared to the other three. It has a wicked looking rotary cannon on its turret, so this commander has some real bite if he needs it. Let’s hope I don’t roll bad and get a poor commander who freezes under pressure...we all know how that turns out.
A bit of work with the Dremel, but not a lot compared to the other three. It has a wicked looking rotary cannon on its turret, so this commander has some real bite if he needs it. Let’s hope I don’t roll bad and get a poor commander who freezes under pressure...we all know how that turns out.


