Sunday, December 31, 2023

Snow in the Trenches


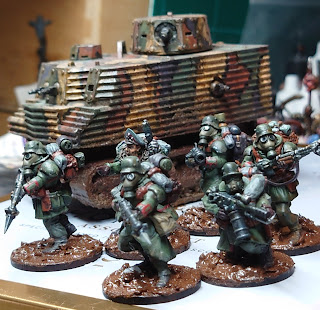
I decided to do something really brave tonight and add snow to the WWW models. I was terrified it would all go wrong and all my hard work would be ruined, however, it's grown on me.
I saw a video from Sonic Sledgehammer on YouTube and decided to follow his lead and add some snow. I wasn't sure at first as I really liked the plain mud, but on comparing the two, the snow bases were so much more interesting.

It also gives a nice cold theme to the collection, something that will be fun to model when it comes to the walkers and vehicles.


As I liked the mud already, I decided not to go too heavy with the snow. This way patches of mud can still come through.

It also ties nicely into the look of the figures, they are completely covered with gasmasks, trenchcoats and gloves, so look well insulated against the cold.


The officers fur lined coat makes a lot more sense now.

I'll have to keep an eye out for a snowy/muddy gaming mat, so these guys will feel at home.


The snow is from a GW pot. Something blizzard, very easy to use, I ended up going back and adding a bit more after the first layer had dried.
These heavy armoured Infantry now trudge along in muddy slush. 

 I curled up some picture wire and added it to the mud. The recently snow fall has almost covered it completely but it is there.

Below is the product from GW that I used for the bases. Recommended!


German Trencher Elites

I set out today to try and master some basic armour techniques. Rather than jump straight in with a big mech model, I thought it wise to try some things out on these smaller test subjects. They are from Alternative Armies and are old sculpts dating back probably to the early Nineties. I bought this pack recently but I do have some from the time somewhere too.

I did think these alternative space marines, with their German style armour would make great Elite infantry. 

At first I tried the chipping fluid again, but like my attempt with the tanks, it didn't work. Then I tried the other method of painting on the chips and this seemed better. I added patches of Doombull brown here and there and also added some watered down weathering fluid. The effects were much better. Right at the end I added some tiny dots from the fine tip marker, these really worked well and we're easy to do.

I was amazed at how different the colours looked under a coat of gloss floor varnish. They seemed to come to life and were much more vibrant. Above you can see the shoulder pauldron has been glossed and how different it looks compared to the rest of the model.

Light infantry and an Elite trooper in heavy armour.
These have just been coated with Kleer floor varnish, but I will give them a coat of Matt to finish them. I might select a few areas to add gloss again after the success of the gas mask lenses on the Lights.


They have an 'Aliens' vibe going on in their gloss coats. They should look a little more WWI when they are dulled down.
I used Tamiya clear green over a white paint to give an intense visor colour. It never fails and always looks good. They also do a red and orange clear paint which I must try. I have a lot of robots to do and this technique should work well for eye lenses.

Time to get in those trenches and flush out the rats.

 Maybe I could add some WWI crosses to these armoured guys to really tie them in to the era. I do love those gas mask lenses...the highlight so far.

Thursday, December 28, 2023

Weird World War I Germans

Having made these minis a while ago from various plastic kits, it was great to finally put some paint on them.
I painted this figure as a guide for the others. I was pleased with how the green armour came out. I wanted him to be mostly green so he said WWI rather than in later greys 


Adding wood to the guns kept them low tech which helped with the First World War vibe.
This officer will have a fancy fur lined coat. I used green stuff to cover the binoculars strap and took as a chance to upgrade his coat.
Modelling this era gives you a chance to try out various mud washes on the market too. I had to fight with myself not to go too crazy with them.


I used a lead pencil to edge the armour plates to give them some wear and tear.In the background is some primitive armour from Pig Iron.

UPDATE:
These squad is now finished, just a bit of work to do on their bases when the mud drys.


I think the high point came when I dropped some gloss varnish into the eye lenses. These really popped against the Matt uniform and made the model look very realistic.
I placed the odd piece of broken duck board and skull into the mud to help with the WWI look.


The good these about Xenos Rampant is the units are five men strong. These soldiers will be classed as Light infantry.


They have the First spear division icon on their right shoulder pauldron. The whole force will share this device and it should be good to tie men and vehicles together.
Basing time... I tried out this new product for me from Green Stuff World. After putting on a layer of Vallejo thick mud, I gave the base a wash with this new light earth. I watered it down slightly so it wasn't so intense. At this point I also used it to weather up the figures too. The heavy vehicles also received a touch up with it. I think it's a great little find and looks great when applied.


Mudding up this soldiers boots was a joy, keeping the dark wet mud on the bottom, but switching to the lighter dry mud further up his leg. It's also the perfect colour to dilute down and wash over the armour. I tried not to go too mad with it, but that's the challenge.
I'm pleased with the colour choices as I think they work well and give a very strong German assectic. Going through Pinterest and looking at loads of references was a big help. There are countless sci-fi illustrations on there as well, an endless source for your imagination.